

AWS setup guide
This guide walks you through creating a read-only IAM user for CLARITY and adding it to your instance.
Prerequisites
- An AWS account with IAM administrative access
- AWS CLI installed or access to the AWS Console
- AWS Cost Explorer enabled in your account
Option 1: AWS cLI (Recommended)
Create a dedicated IAM user with AWS-managed read-only policies:
# Create a dedicated IAM user for CLARITY
aws iam create-user --user-name clarity-finops

# Attach read-only access (covers all resource discovery, metrics, etc.)
aws iam attach-user-policy --user-name clarity-finops \
  --policy-arn arn:aws:iam::aws:policy/ReadOnlyAccess

# Attach billing read access (Cost explorer, budgets, anomalies)
aws iam attach-user-policy --user-name clarity-finops \
  --policy-arn arn:aws:iam::aws:policy/AWSBillingReadOnlyAccess

# Create access keys (save the output — the secret is shown only once)
aws iam create-access-key --user-name clarity-finops
Save the AccessKeyId and SecretAccessKey from the output. You will need both when adding the account to CLARITY.
Why ReadOnlyAccess?
ReadOnlyAccess is an AWS-managed policy that grants read-only access across all AWS services. CLARITY uses this broad access to discover all resources that may generate costs — EC2 instances, RDS databases, S3 buckets, EBS volumes, snapshots, load balancers, Lambda functions, ECS/EKS clusters, ElastiCache, ECR repositories, Route53 zones, NAT gateways, and more. This ensures complete visibility into idle, oversized, and underutilized resources across your account.
Option 2: cloudFormation template
Deploy the IAM user with managed policies as a CloudFormation stack:
AWSTemplateFormatVersion: '2010-09-09'
Description: CLARITY FinOps — Read-only IAM user for cost management

Resources:
  ClarityFinOpsUser:
    Type: AWS::IAM::User
    Properties:
      UserName: clarity-finops
      ManagedPolicyArns:
        - arn:aws:iam::aws:policy/ReadOnlyAccess
        - arn:aws:iam::aws:policy/AWSBillingReadOnlyAccess
      Tags:
        - Key: Purpose
          Value: CLARITY FinOps read-only access

  ClarityAccessKey:
    Type: AWS::IAM::AccessKey
    Properties:
      UserName: !Ref ClarityFinOpsUser

Outputs:
  AccessKeyId:
    Description: Access Key ID for CLARITY
    Value: !Ref ClarityAccessKey
  SecretAccessKey:
    Description: Secret Access Key for CLARITY (retrieve from CloudFormation console)
    Value: !GetAtt ClarityAccessKey.SecretAccessKey
Deploy the stack:
aws cloudformation deploy \
  --template-file clarity-iam.yaml \
  --stack-name clarity-finops-iam \
  --capabilities CAPABILITY_NAMED_IAM

# Retrieve the access keys from stack outputs
aws cloudformation describe-stacks \
  --stack-name clarity-finops-iam \
  --query "Stacks[0].Outputs"
Adding to CLARITY
- Log in to CLARITY and navigate to Provider Setup (gear icon in the sidebar)
- Click Add Account
- Select AWS as the provider
- Enter the following:
- Access Key ID — from the IAM user creation output
- Secret Access Key — from the IAM user creation output
- Account Name (optional) — a friendly label like "Production" or "Dev/Staging"
- Click Save
CLARITY validates the credentials immediately and begins the initial sync. You will see a progress indicator while resources, costs, and metrics are pulled from your account.
Verification
After the initial sync completes (typically 2-5 minutes), verify that data is flowing:
- Dashboard — Cost breakdown by service and region should appear
- Resources — Your EC2 instances, RDS databases, S3 buckets, and other resources should be listed with cost estimates
- Insights — Optimization recommendations for idle or underutilized resources
- Forecast — Cost projections based on your billing history
If the dashboard shows cost data but the resource list is empty, the IAM user may be missing some Describe* permissions. Check the sync logs for specific errors.
AWS Organizations
If your account is a management (payer) account in an AWS Organization, CLARITY automatically discovers all member accounts and reports organization-level costs. The organizations:DescribeOrganization and organizations:ListAccounts permissions (included in ReadOnlyAccess) enable this. Member accounts will show as linked accounts in the Organizations page.
Cost Explorer Activation
AWS Cost Explorer must be enabled in your account before CLARITY can retrieve billing data. If you have never used Cost Explorer:
- Go to the AWS Cost Explorer console
- Click Enable Cost Explorer
- Wait up to 24 hours for historical data to become available
Cost Explorer API calls are billed at $0.01 per request, against your account.
The automated sync costs 5 to 20 Cost Explorer requests per account per day — roughly $1.50 to $6 per account per month. On eleven of the fourteen days measured on this deployment it was exactly 5 per account. On 7 September 2026 it was 20, on the same two accounts, with nothing changed in the configuration: the per-resource pass returned 3,747 cost rows that day against 271 the day before, and more data means more pages, and every page is a separately billed request.
That is the honest shape of it. The floor is the number of queries we issue; the ceiling is how much your accounts have to say. A quiet estate stays near 5. An estate where we are newly discovering resources — after onboarding, or after a fix lands that reaches services we could not attribute before — costs more on the days that work happens.
What you do with the product costs more than the sync does. The Forecast and Commitments pages query Cost Explorer directly when you open them, and across the whole measured period 47% of all Cost Explorer requests came from someone opening one of those two screens, not from syncing. A single day of active use added 47 requests. Leaving those pages closed costs nothing.
So the honest statement is a floor plus your usage, not a range:
| Requests | Cost | |
|---|---|---|
| Automated sync, per account | 5-20/day, driven by how much data comes back | ~$1.50-$6/account/month |
| Opening Forecast or Commitments | 0 if never opened; measured up to 47 on one active day | $0 to a few dollars a month |
| One-time historical backfill, first connect only | once per account, ever | a few cents, once |
These are counted, not modelled: every billable request is recorded as it is made, and the API Fees tab on the Organizations page shows the real figure for your own accounts. Do not take the numbers above as yours — take them as the shape, and read your own.
Container restarts do not trigger redundant syncs: the scheduler decides whether a provider is due from the last completed sync recorded in the database, so a restart cannot re-bill you for a sync that already ran within the provider's interval.
Resource-Level Cost Data (Recommended)
For CLARITY to attribute costs directly to individual resources (EC2 instances, RDS databases, etc.) using real billing data, a setting must be enabled in the AWS Billing Console. This is a billing console checkbox — not an IAM policy or role. Your IAM user already has the right permissions, but the data itself is not generated until this setting is turned on.
- Sign in to the AWS Cost Management Preferences with the management (payer) account
- Select the Cost Explorer tab
- Under Granular data > Daily granularity (up to 14 days of past data), check "Resource-level data at daily granularity"
- A dropdown labeled "AWS services at daily granularity" will appear — select All to enable resource-level data for every service
- Click Save
- Wait up to 24 hours for resource-level data to become available
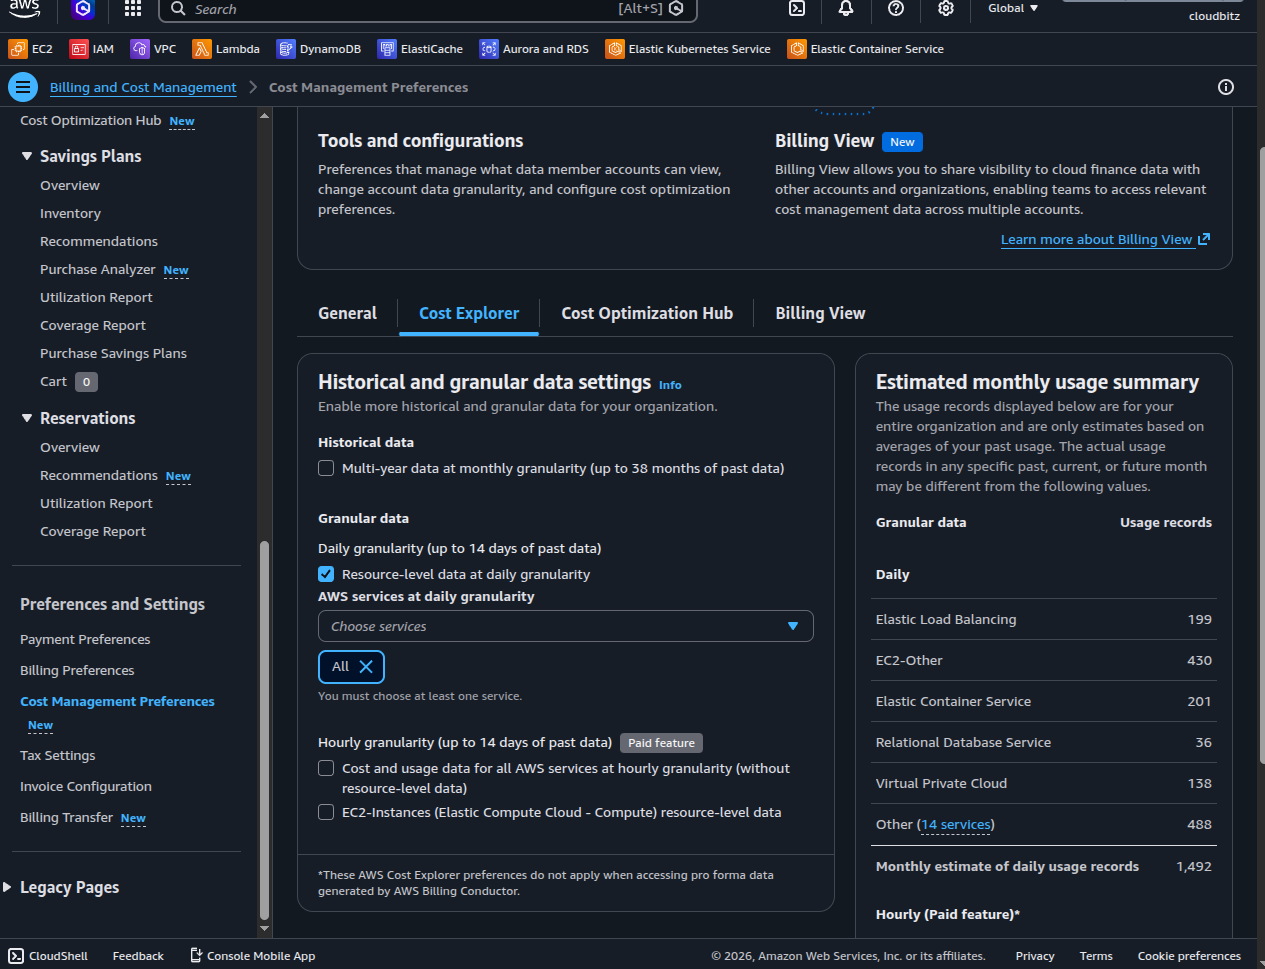
This setting is free — there is no extra charge for daily resource-level data. The hourly granularity options on the same page are marked "Paid feature" but are not required by CLARITY.
Without this setting, CLARITY still provides accurate service-level costs and resource cost estimates via dynamic pricing tables, but cannot use the direct billing API (GetCostAndUsageWithResources) for per-resource cost attribution from real invoices.
If your account is a member account in an AWS Organization, only the organization administrator can enable this from the management (payer) account.
Cleanup
To remove CLARITY access from your AWS account:
# Delete the access key
aws iam delete-access-key --user-name clarity-finops \
  --access-key-id YOUR_ACCESS_KEY_ID

# Detach policies
aws iam detach-user-policy --user-name clarity-finops \
  --policy-arn arn:aws:iam::aws:policy/ReadOnlyAccess
aws iam detach-user-policy --user-name clarity-finops \
  --policy-arn arn:aws:iam::aws:policy/AWSBillingReadOnlyAccess

# Delete the user
aws iam delete-user --user-name clarity-finops
Or if you used the CloudFormation template:
aws cloudformation delete-stack --stack-name clarity-finops-iam